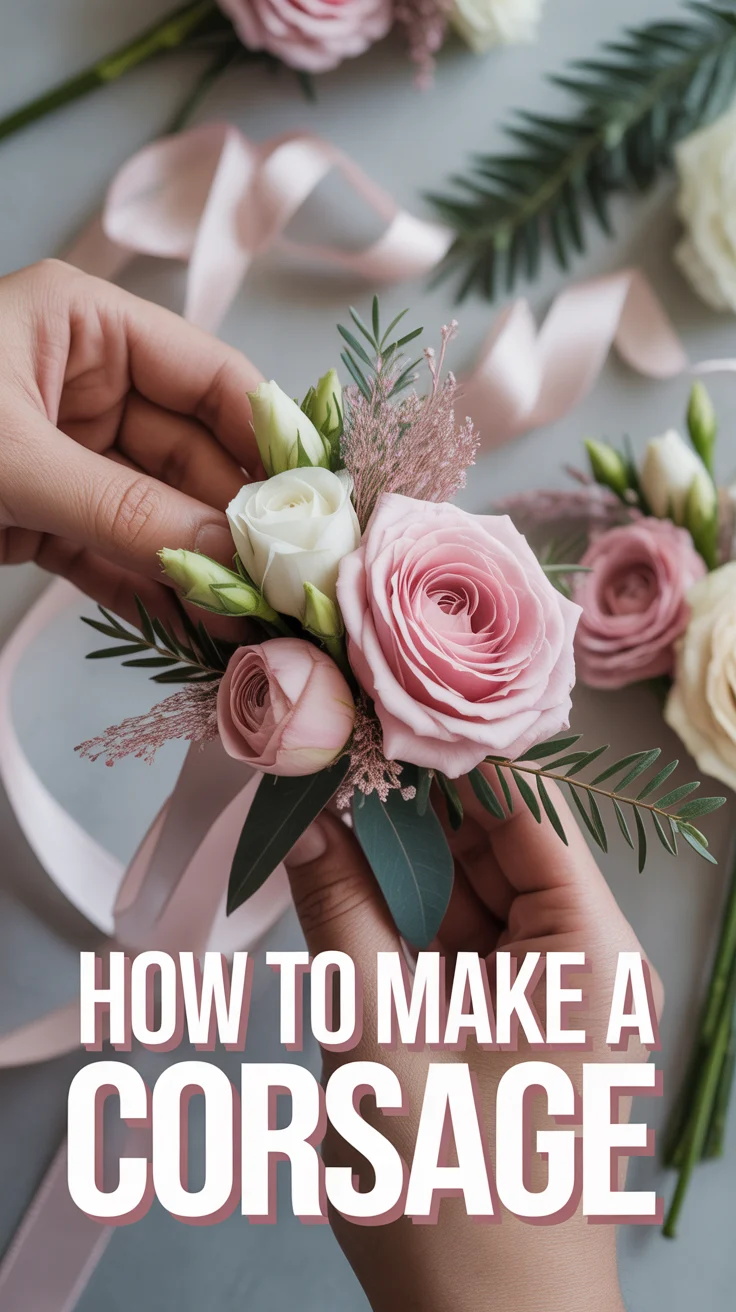
🌸 How To Make A Corsage
💍 The Bride's Essential Toolkit
Planning, styling, and surviving the big day takes the right gear. These are the 5 must-have items that professional wedding planners and real brides swear by — from flawless dress prep to stress-free organization.
👗 Conair Turbo ExtremeSteam Handheld Steamer
Professional bridal stylists universally rely on this exact steamer to remove every last wrinkle from delicate wedding gowns and veils without risking heat damage. Its powerful continuous steam penetrates heavy satin and tulle layers that flat irons simply cannot handle safely.
📋 The Knot Ultimate Wedding Planner & Organizer
With over 50,000 five-star reviews, this is the definitive organizational bible that real brides credit with keeping their entire wedding on track. It includes checklists, budget worksheets, and timelines that eliminate the chaos and stress of planning every last detail.
💇♀️ Revlon One-Step Hair Dryer & Volumizer
The single most viral bridal hairstyling tool on the market. This award-winning hot air brush delivers salon-quality blowout volume and smoothness in one pass — perfect for bridal party prep when you need gorgeous hair without booking 6 separate stylists.
📸 Fujifilm Instax Mini 12 Instant Camera
The hottest wedding reception trend that guests absolutely love. Place these on each table and watch as your guests capture candid, one-of-a-kind moments that even a professional photographer would miss — instant physical keepsakes your family will treasure forever.
🩹 Wedding Day Emergency Kit
Every experienced wedding coordinator carries one of these. It includes fashion tape, stain remover, sewing kit, pain relievers, and dozens of other tiny lifesavers that prevent wardrobe malfunctions and minor disasters from derailing the most important day of your life.
Imagine the delicate flutter of a handcrafted corsage, a whisper of beauty adorning a cherished wrist or lapel, a timeless memento of a day steeped in love and celebration. In a world brimming with fleeting trends, there’s an undeniable magic in creating something with your own hands – a personal touch that transforms an event into an unforgettable tapestry of memories, a true Pinterest-worthy masterpiece reflecting your unique love story.
Quick Overview
This guide will empower you to craft a breathtaking corsage, whether for a bride, a beloved mother, a cherished bridesmaid, or a dazzling prom attendee. You’ll learn to select, prepare, and assemble fresh blooms into a wearable work of art, infused with elegance and personal meaning.
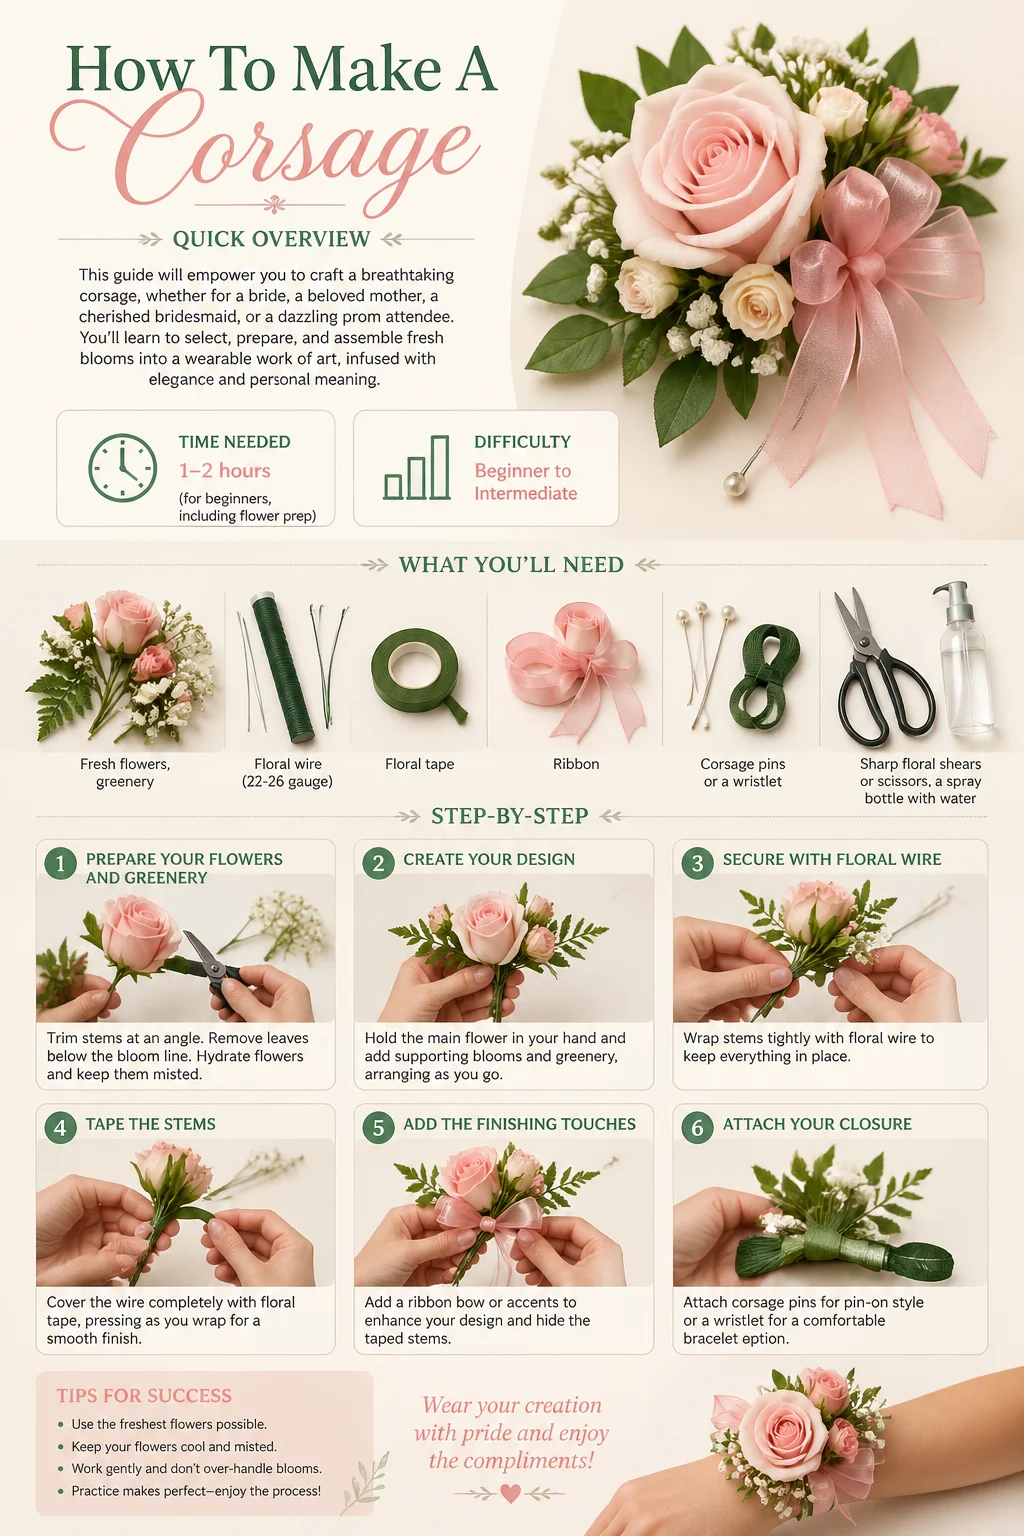
- Time needed: 1-2 hours (for beginners, including flower prep)
- Difficulty: Beginner to Intermediate
- What you’ll need: Fresh flowers, greenery, floral wire (22-26 gauge), floral tape, ribbon, corsage pins or a wristlet, sharp floral shears or scissors, a spray bottle with water.
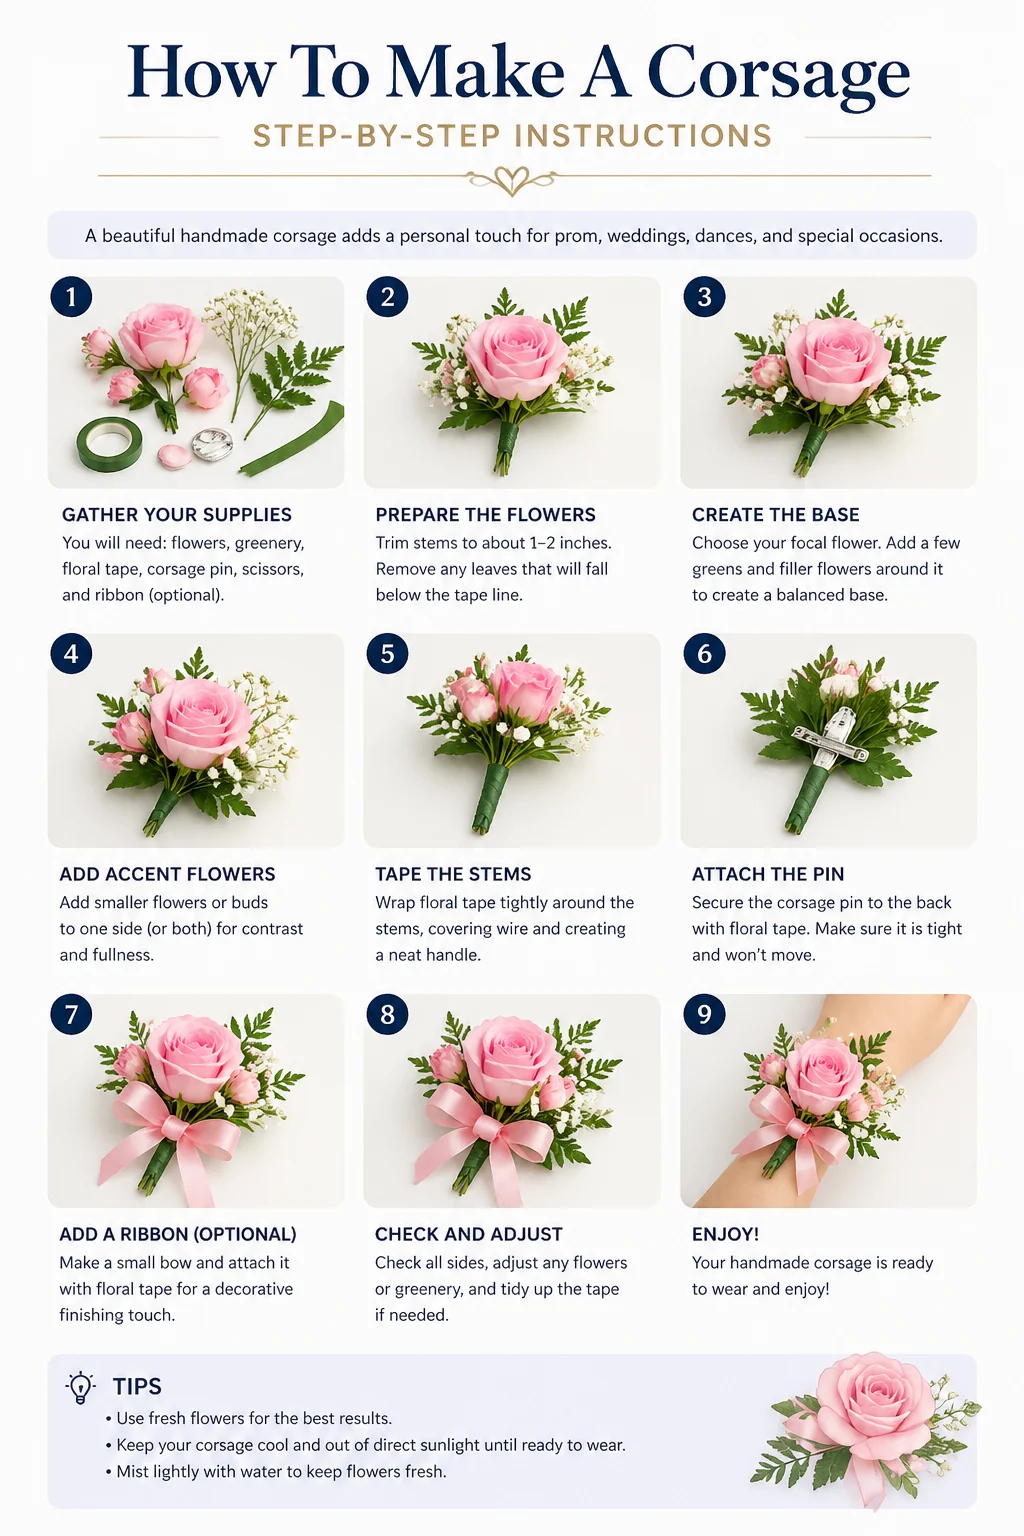
Step-by-Step Instructions
Step 1: Envision Your Dream Corsage & Gather Your Treasures
The journey to creating a truly captivating corsage begins with a dream – an ethereal vision of colors, textures, and fragrances that speak to the heart of your special occasion. This is where your Pinterest boards come to life, where inspiration blossoms into tangible beauty. Consider the overall aesthetic of the event: Is it a romantic garden wedding, a sophisticated black-tie gala, a whimsical bohemian celebration, or a vibrant prom night?
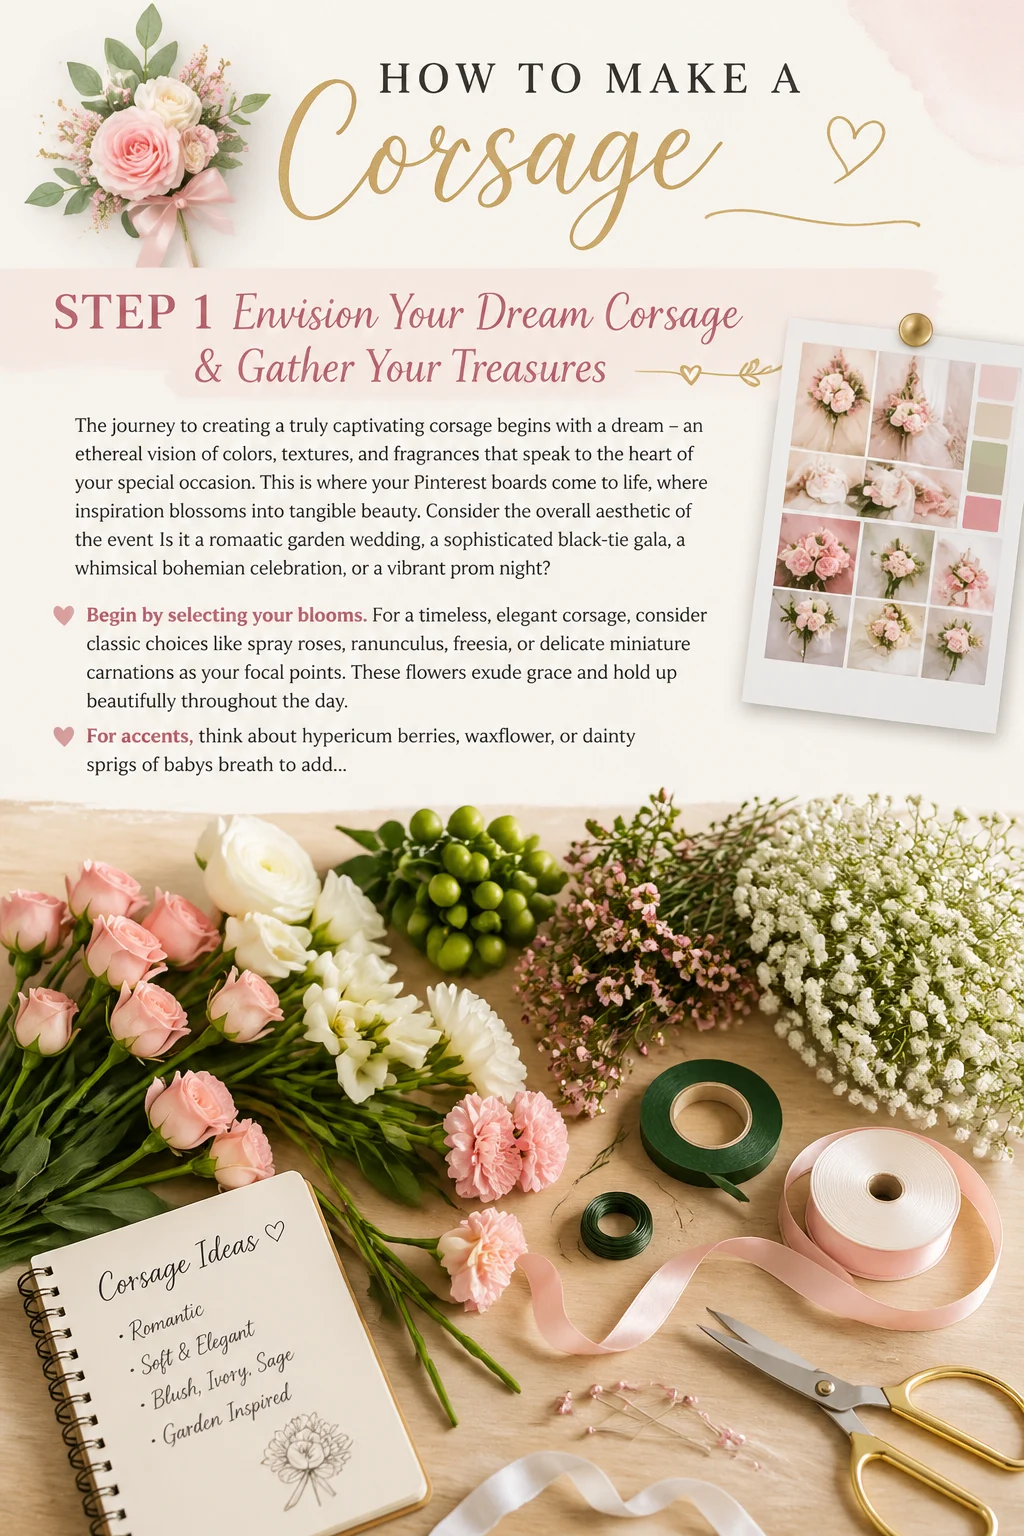
Begin by selecting your blooms. For a timeless, elegant corsage, consider classic choices like spray roses, ranunculus, freesia, or delicate miniature carnations as your focal points. These flowers exude grace and hold up beautifully throughout the day. For accents, think about hypericum berries, waxflower, or dainty sprigs of baby’s breath to add texture and visual interest. Greenery is the soul of a corsage, providing a lush backdrop and framing your chosen flowers. Eucalyptus (silver dollar or seeded), dusty miller with its velvety grey leaves, or delicate ruscus can add a touch of sophisticated charm.
When planning for a wedding, let your corsage harmonize with the bridal fashion. If the bride’s gown features intricate lace, perhaps a corsage with delicate, lacy greenery or a pearl-adorned wristlet would be divine. For a minimalist, sleek silhouette, a corsage with clean lines and a single impactful bloom might be perfect. Consider the broader decorations – if the reception hall is adorned with blush and gold, select flowers that echo this romantic palette. The corsage should feel like an extension of the entire celebration, a miniature symphony of the day’s beauty.
Think about the wearer: will this corsage be pinned to a lapel, or will it grace a wrist? For a wrist corsage, remember that it will sit alongside rings – perhaps a sparkling engagement ring or a cherished wedding band. Choose colors and sizes that complement, rather than overpower, these precious symbols. If the wearer has a particular hairstyle planned, ensure the corsage doesn’t clash with any hair accessories, but rather enhances the overall look.
Once your vision is clear, procure your flowers. Aim for fresh, vibrant blooms that are just beginning to open. Purchase them a day or two before you plan to assemble, giving them time to fully hydrate. Upon arrival, gently unwrap them, remove any leaves below the waterline, and cut the stems at an angle under running water. Place them immediately into clean vases filled with fresh water and floral food. This crucial step ensures their longevity, keeping them looking fresh and dewy throughout your special day.
Pro tip: For an extra touch of romance, choose flowers that hold sentimental value – perhaps the same variety used in the bridal bouquet, or a bloom that signifies a shared memory or a cherished meaning.
Step 2: Prepare Your Blooms with Grace
With your carefully selected flowers hydrated and ready, it’s time to prepare each individual bloom for its starring role. This step is about refining each element, ensuring it’s poised for perfection.
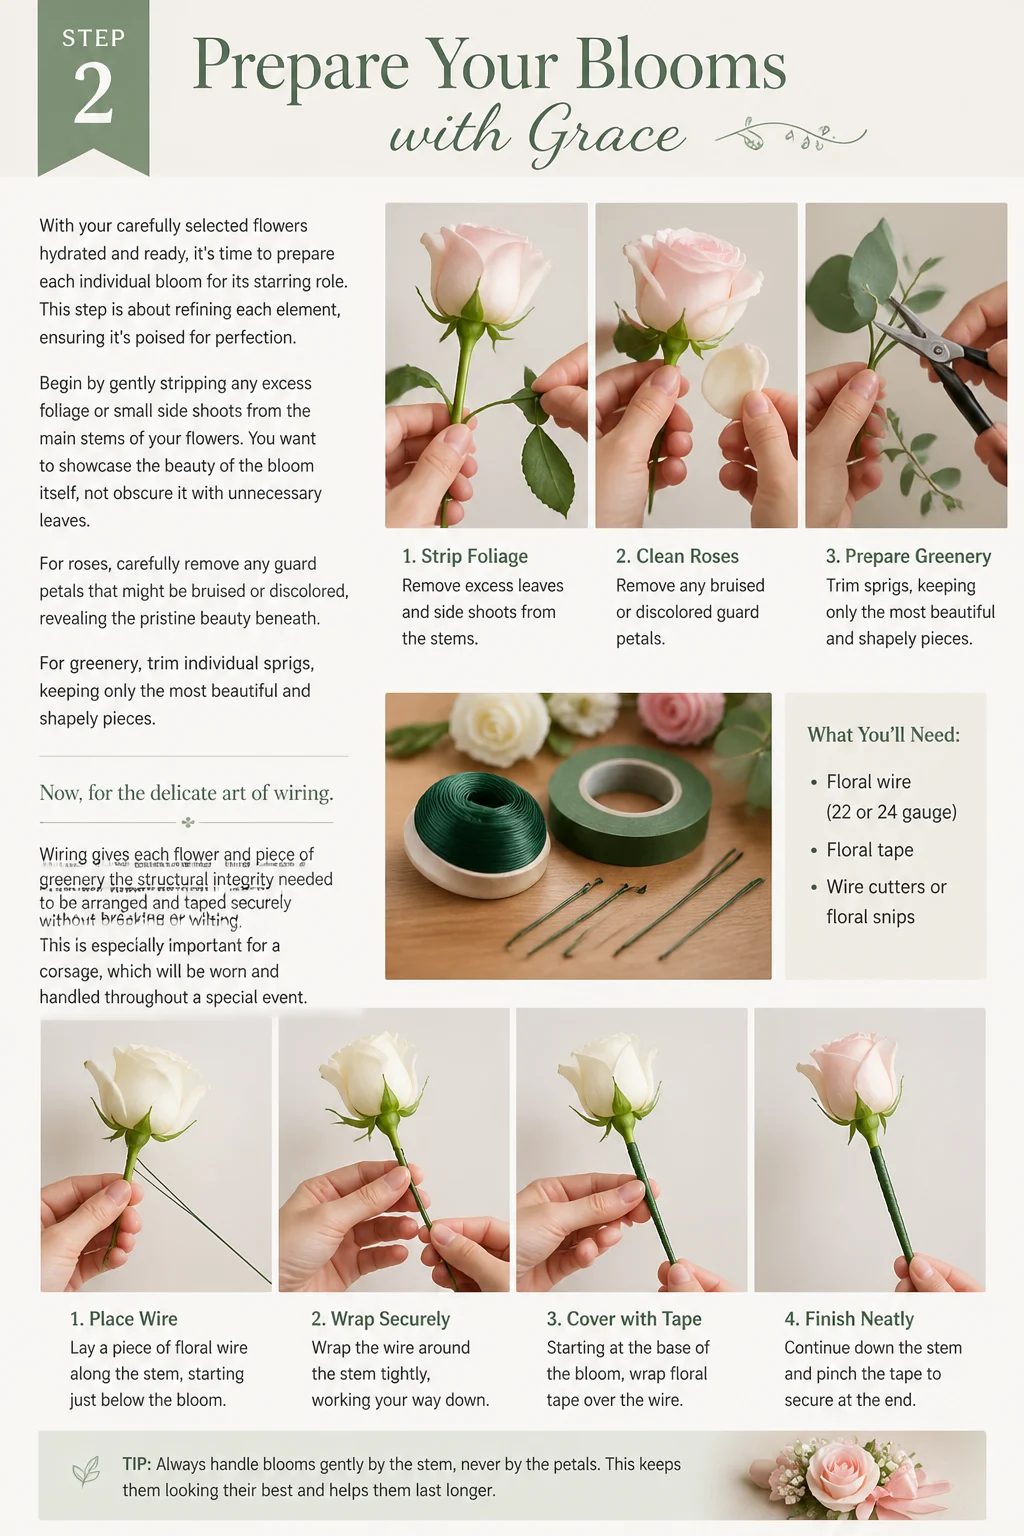
Begin by gently stripping any excess foliage or small side shoots from the main stems of your flowers. You want to showcase the beauty of the bloom itself, not obscure it with unnecessary leaves. For roses, carefully remove any guard petals that might be bruised or discolored, revealing the pristine beauty beneath. For greenery, trim individual sprigs, keeping only the most beautiful and shapely pieces.
Now, for the delicate art of wiring. Wiring gives each flower and piece of greenery the structural integrity needed to be arranged and taped securely without breaking or wilting. This is especially important for flowers with tender stems or heavy heads.
For most flowers like roses, ranunculus, or carnations:
- Take a piece of floral wire (22 or 24 gauge is common) about 4-6 inches long.
- Gently push the wire through the base of the flower head, just beneath the calyx (the green part that holds the petals). Push it all the way through until half the wire is on one side and half on the other.
- Bend both ends of the wire down parallel to the stem.
- For extra security, you can wrap one wire end around the stem and the other wire end around the first wire, creating a sturdy new stem.
For delicate blooms like freesia or berries:
- Use a finer gauge wire (26 gauge).
- Gently push the wire up through the hollow stem from the cut end, until it reaches just below the flower head. This method is called “piercing” or “stemming.”
- Bend the wire over the top of the stem to secure it, then wrap the wire around the existing stem.
For greenery:
- Simply insert a wire through the base of the leaf or sprig and bend it down, or wrap the wire around the stem.
Once wired, you’ll “tape” each individual wired stem using floral tape. This waxy, self-adhesive tape not only covers the wire for a cleaner look but also helps seal in moisture, further preserving your blooms. Starting just below the flower head, stretch the tape slightly as you wrap it downwards, spiraling tightly around the wire and original stem until you reach the end. Ensure there are no gaps where moisture could escape. Each petal, a delicate promise; each stem, a conduit of beauty, now prepared to join its companions in a harmonious embrace.
Step 3: Crafting the Heart of Your Corsage – The Focal Point
Every masterpiece needs a heart, and your corsage is no exception. This step involves selecting your star bloom and positioning it as the undeniable focal point, around which all other elements will gracefully orbit. Choose your most perfect, most captivating flower – perhaps a fully opened spray rose, a lush ranunculus, or a pristine gardenia bud. This bloom will set the tone and scale for your entire creation.
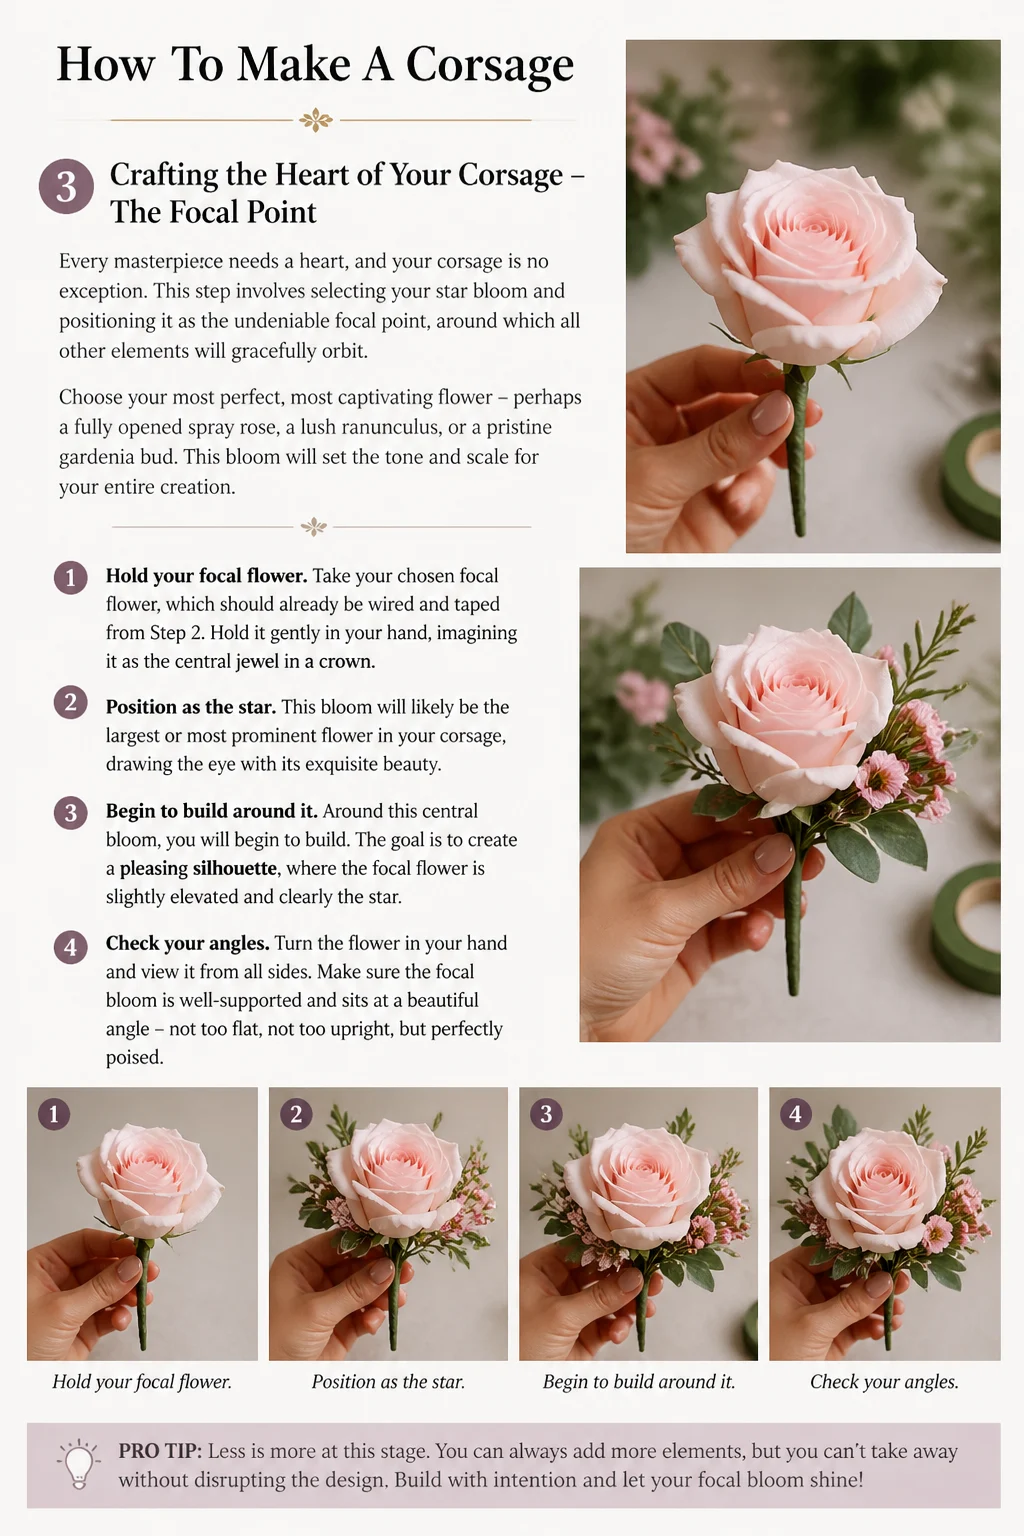
Take your chosen focal flower, which should already be wired and taped from Step 2. Hold it gently in your hand, imagining it as the central jewel in a crown. This bloom will likely be the largest or most prominent flower in your corsage, drawing the eye with its exquisite beauty.
Around this central bloom, you will begin to build. The goal is to create a pleasing silhouette, whether it’s a classic rounded shape, a more elongated cascading design, or a modern, asymmetrical cluster. This is where your artistic eye truly comes into play.
Pro tip: When selecting your focal flower, consider not just its beauty but also its resilience. A flower that can withstand gentle handling and maintain its charm throughout the event is ideal.
Step 4: Weaving in the Supporting Cast – Accent Flowers & Greens
Now, the magic truly begins as you weave in the supporting cast of accent flowers and lush greenery, transforming your focal point into a multidimensional symphony of nature’s artistry. This is where you add depth, texture, and that coveted “Pinterest-worthy” appeal.
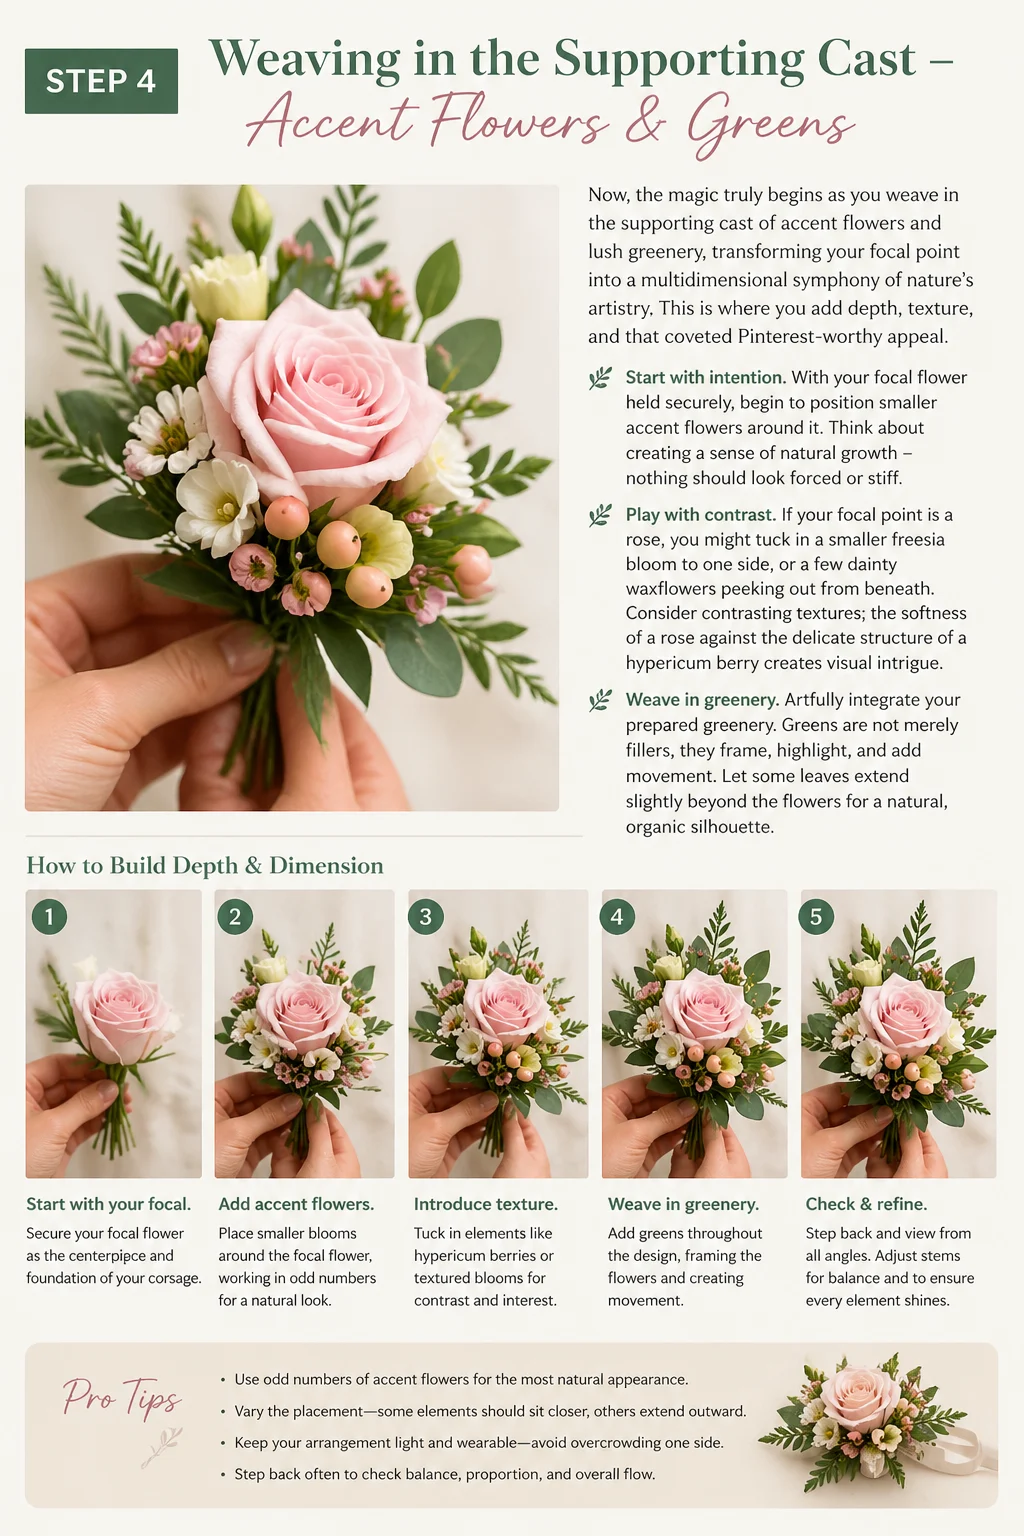
With your focal flower held securely, begin to position smaller accent flowers around it. Think about creating a sense of natural growth – nothing should look forced or stiff. If your focal point is a rose, you might tuck in a smaller freesia bloom to one side, or a few dainty waxflowers peeking out from beneath. Consider contrasting textures; the softness of a rose against the delicate structure of a hypericum berry creates visual intrigue.
Next, artfully integrate your prepared greenery. Greens are not merely fillers; they are essential for creating the romantic, ethereal backdrop that elevates a corsage from simple to stunning. Tuck sprigs of eucalyptus or dusty miller strategically around and behind your flowers. Let some pieces extend slightly beyond the blooms, creating a soft, natural frame. The silvery tones of eucalyptus can beautifully complement a cool-toned color palette, while the velvety texture of dusty miller adds a touch of vintage charm, perfect for a rustic-chic wedding or an elegant anniversary celebration.
As you add each element, hold the corsage up and view it from different angles. Look for balance and harmony. You want a cohesive piece where each flower and leaf feels intentionally placed, contributing to the overall beauty without overwhelming its neighbors. Aim for a sense of organic movement, as if the flowers have naturally grown together in this perfect miniature cluster. This is where the dreamy aesthetic truly comes alive.
Pro tip: Don’t be afraid of asymmetry. A slightly unbalanced design can often feel more organic and artistic than a perfectly symmetrical one, adding a modern twist to timeless elegance.
Step 5: Taping it All Together – A Secure Embrace
Once you are satisfied with the arrangement of your flowers and greenery, it’s time to bind them together into a single, cohesive unit. This step is crucial for the structural integrity of your corsage, ensuring it remains beautiful and intact throughout the celebration.
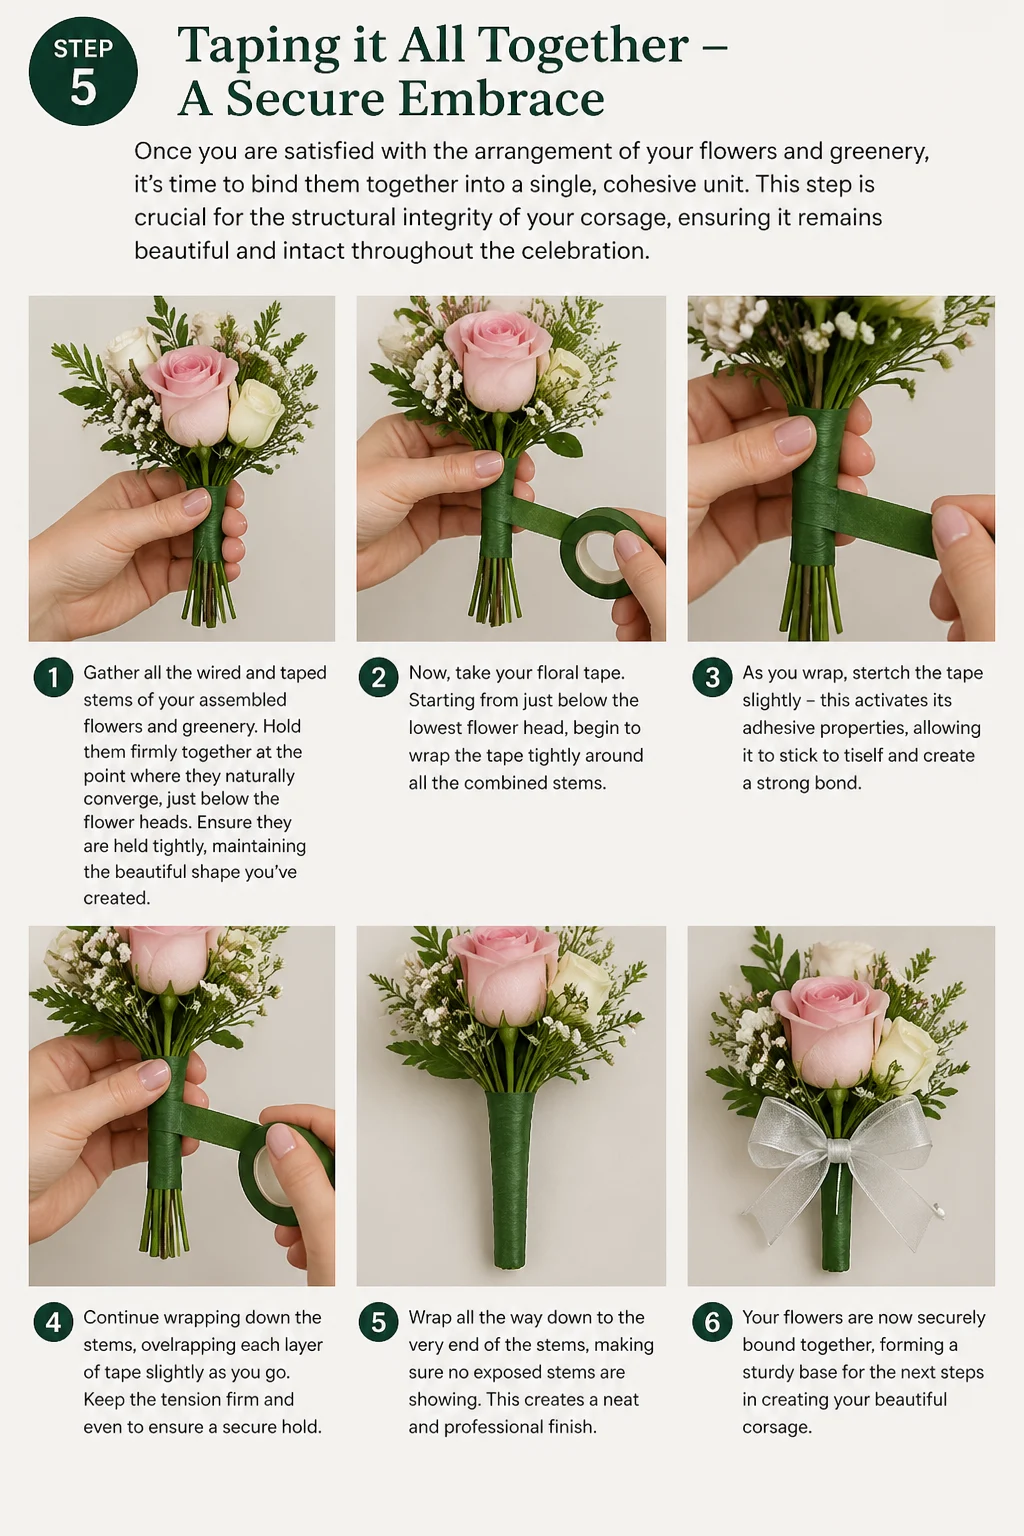
Gather all the wired and taped stems of your assembled flowers and greenery. Hold them firmly together at the point where they naturally converge, just below the flower heads. Ensure they are held tightly, maintaining the beautiful shape you’ve created.
Now, take your floral tape. Starting from just below the lowest flower head, begin to wrap the tape tightly around all the combined stems. As you wrap, stretch the tape slightly – this activates its adhesive properties, allowing it to stick to itself and create a strong bond. Spiral downwards, overlapping each layer of tape to ensure full coverage. Continue wrapping until you have covered about 2-3 inches of the combined stems, creating a sturdy, neat “handle.”
The goal is to create a firm, compact base that will hold all the elements securely in place. Press the tape firmly as you go, ensuring no wires are exposed and the stems feel solid. This neat base is not only functional but also contributes to the overall polished look of your corsage. A well-taped base feels comfortable and secure, allowing the wearer to enjoy the beauty without worry.
Pro tip: To create a slightly curved base for a wrist corsage, gently bend the taped stem bundle into a soft arc while the tape is still malleable. This will help it sit more comfortably against the wrist.
Step 6: The Ribbon’s Romantic Flourish
The ribbon is the crowning glory of your corsage, adding a touch of softness, elegance, and personal style. It’s an opportunity to infuse more of the event’s theme and color palette into your creation.
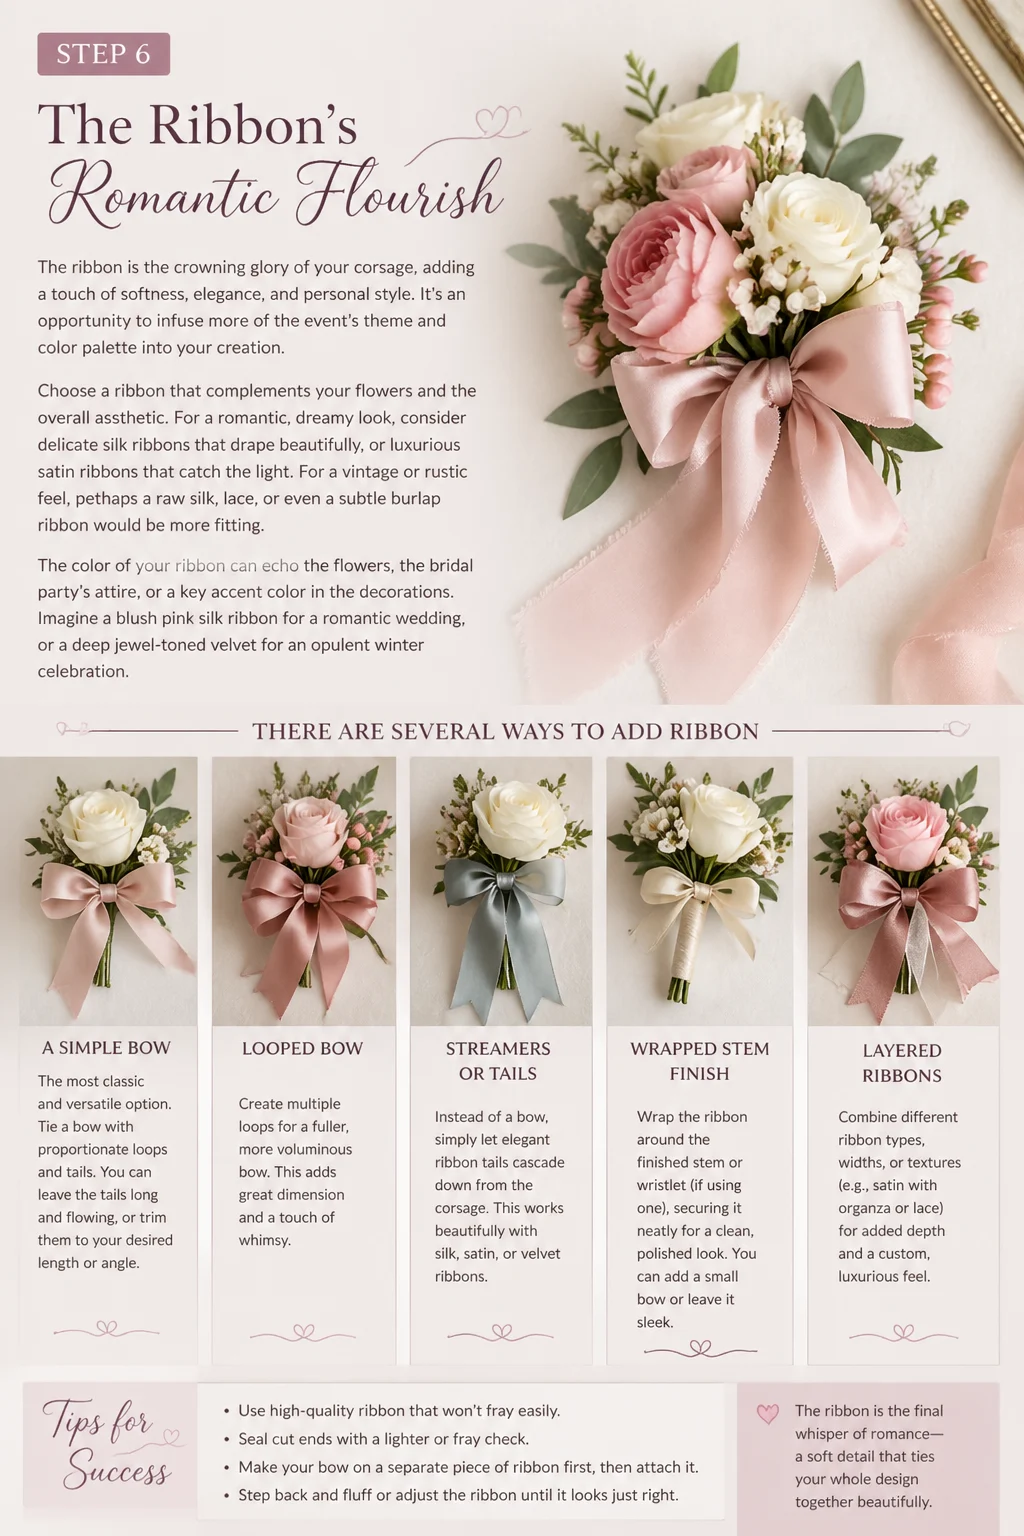
Choose a ribbon that complements your flowers and the overall aesthetic. For a romantic, dreamy look, consider delicate silk ribbons that drape beautifully, or luxurious satin ribbons that catch the light. For a vintage or rustic feel, perhaps a raw silk, lace, or even a subtle burlap ribbon would be more fitting. The color of your ribbon can echo the flowers, the bridal party’s attire, or a key accent color in the decorations. Imagine a blush pink silk ribbon for a romantic wedding, or a deep jewel-toned velvet for an opulent winter celebration.
There are several ways to add ribbon:
- A Simple Bow: Cut a length of ribbon (about 18-24 inches, depending on desired bow size). Tie a classic, elegant bow around the taped stem base, ensuring the loops are symmetrical and the tails hang gracefully.
- Ribbon Loops: Create several small loops of ribbon and secure them with a piece of floral wire. Tape this wired ribbon cluster to the back of your corsage, allowing the loops to peek out from behind the flowers, adding volume and softness.
- Trailing Ribbons: For a more dramatic and whimsical effect, tie several long, flowing ribbons of varying textures and lengths around the base. These can gently cascade down, adding movement and an ethereal quality, perfect for a bohemian bride or a whimsical outdoor ceremony.
Once your ribbon is secured, trim the ends at an angle or create a graceful “V” shape. For satin or synthetic ribbons, you can gently singe the cut ends with a lighter (very carefully!) to prevent fraying, ensuring a perfectly polished finish. The ribbon should feel like a natural extension of the flowers, a soft embrace that completes the design.
Pro tip: For a truly luxurious feel, layer two different ribbons – perhaps a wider satin base with a narrower, sheer organza or delicate lace ribbon tied over it.
Step 7: The Final Touch – Attaching the Pin or Wristlet
Your beautiful floral arrangement is almost complete! The penultimate step is to prepare it for wear by attaching either a corsage pin or a wristlet, depending on your initial vision.
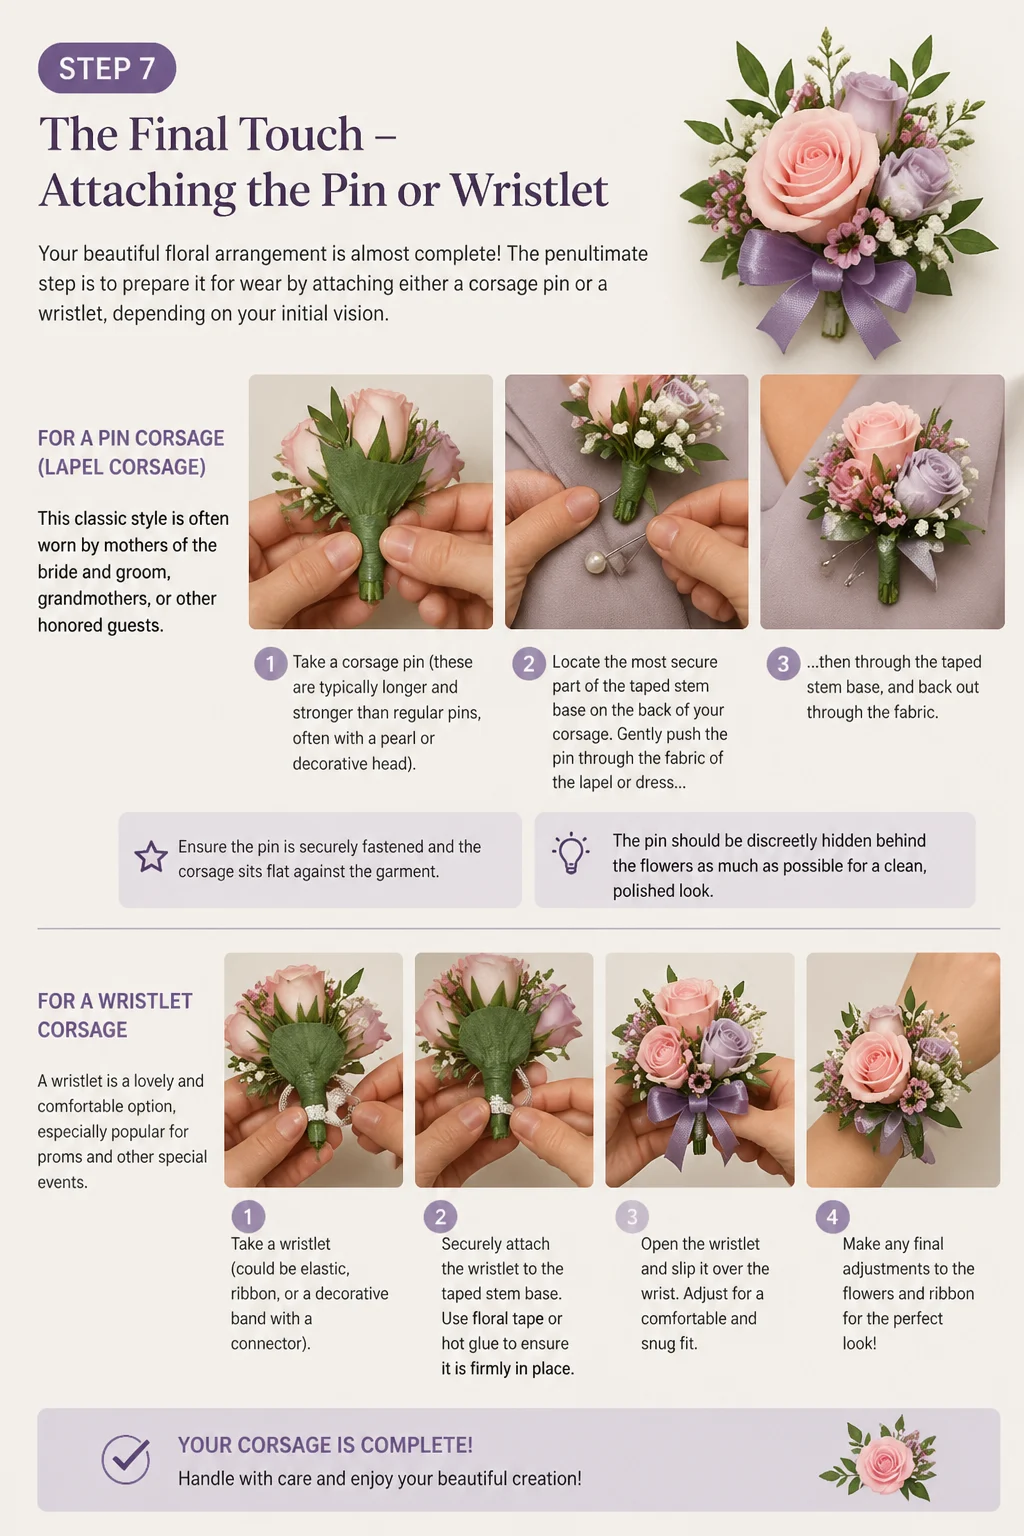
For a Pin Corsage (Lapel Corsage):
This classic style is often worn by mothers of the bride and groom, grandmothers, or other honored guests.
- Take a corsage pin (these are typically longer and stronger than regular pins, often with a pearl or decorative head).
- Locate the most secure part of the taped stem base on the back of your corsage.
- Gently push the pin through the fabric of the lapel or dress, then through the taped stem base, and back out through the fabric. Ensure the pin is securely fastened and the corsage sits flat against the garment. The pin should be discreetly hidden behind the flowers as much as possible.
For delivery, you can simply include a corsage pin alongside the finished piece, allowing the wearer to attach it themselves.
For a Wrist Corsage:
This popular choice is elegant and comfortable, perfect for bridesmaids, prom-goers, or a modern bride.
- You will need a corsage wristlet. These come in various styles – elastic bands, pearl bracelets, or even more elaborate designs with rhinestones or lace.
- Using a strong adhesive like hot glue (use sparingly and carefully) or a fine gauge wire, attach the taped stem base of your corsage securely to the central plate or attachment point of the wristlet.
- Ensure the corsage is firmly adhered and won’t detach with movement. If using wire, thread it through the wristlet’s attachment points and around the taped stem base, twisting to secure. Trim any excess wire.
- The corsage should sit comfortably and beautifully on the wrist, with the flowers facing upwards.
The finished corsage, whether pinned or worn on the wrist, should feel like a natural extension of the wearer’s elegance, a tiny garden of joy ready to accompany them through their special moments.
Step 8: Misting & Preserving Your Masterpiece
Your breathtaking corsage is complete, a testament to your creativity and love! The final, crucial step is to ensure its freshness and longevity, preserving its delicate beauty until the moment it’s proudly worn.
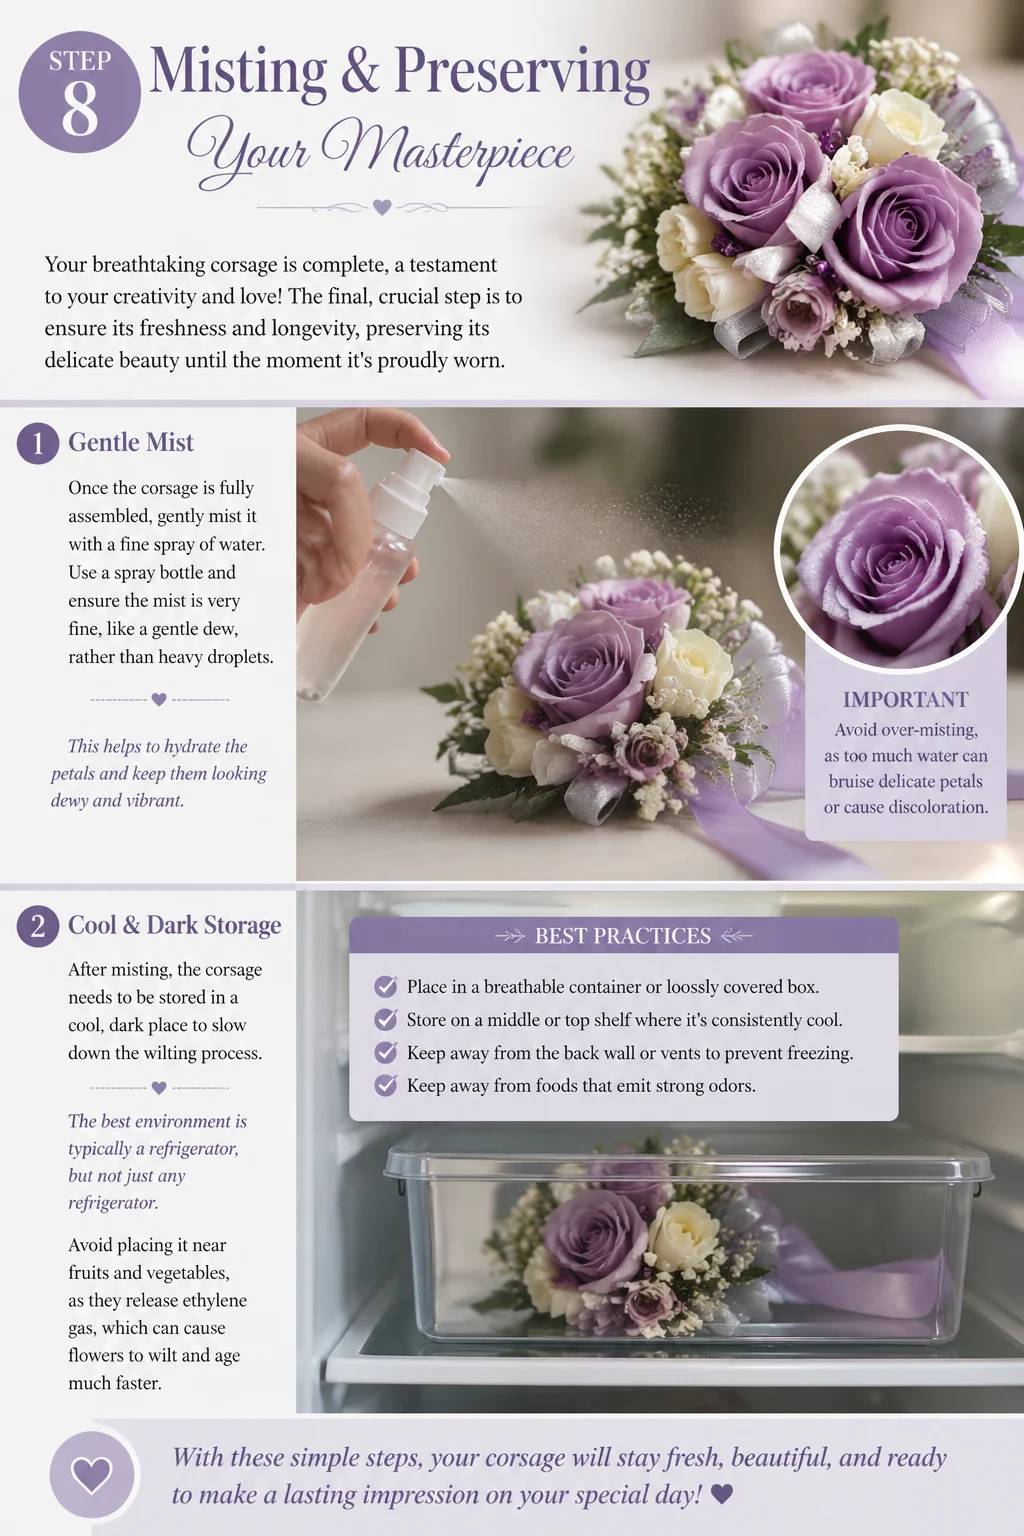
Once the corsage is fully assembled, gently mist it with a fine spray of water. Use a spray bottle and ensure the mist is very fine, like a gentle dew, rather than heavy droplets. This helps to hydrate the petals and keep them looking dewy and vibrant. Avoid over-misting, as too much water can bruise delicate petals or cause discoloration.
After misting, the corsage needs to be stored in a cool, dark place to slow down the wilting process. The best environment is typically a refrigerator, but not just any refrigerator. Avoid placing it near fruits and vegetables, as they release ethylene gas which can prematurely age and wilt flowers. If you have a dedicated floral refrigerator, that’s ideal. Otherwise, a regular household refrigerator will work, as long as it’s not too cold (avoid freezing temperatures) and away from ripening produce.
To protect the corsage while refrigerating, place it gently in a box or a plastic container. You can line the container with a damp paper towel (not soaking wet) to maintain humidity, then cover it lightly with plastic wrap or a lid. This creates a miniature humid environment that helps the flowers retain their moisture.
Plan to make your corsage no more than 12-24 hours before it needs to be worn. While some hardy flowers can last longer, making it closer to the event ensures peak freshness and vibrancy. Imagine the joy of presenting a corsage that looks as if it was just plucked from an enchanted garden, a perfect reflection of the day’s magic.
Pro tip: For an extra layer of protection and to ensure the corsage stays pristine, consider purchasing a clear plastic corsage box from a floral supply store. These boxes are designed to keep the corsage safe from crushing and provide a lovely presentation.
Common Mistakes to Avoid
Creating a corsage is a delightful process, but a few common pitfalls can hinder the final result. Be mindful of these to ensure your creation is nothing short of perfection:
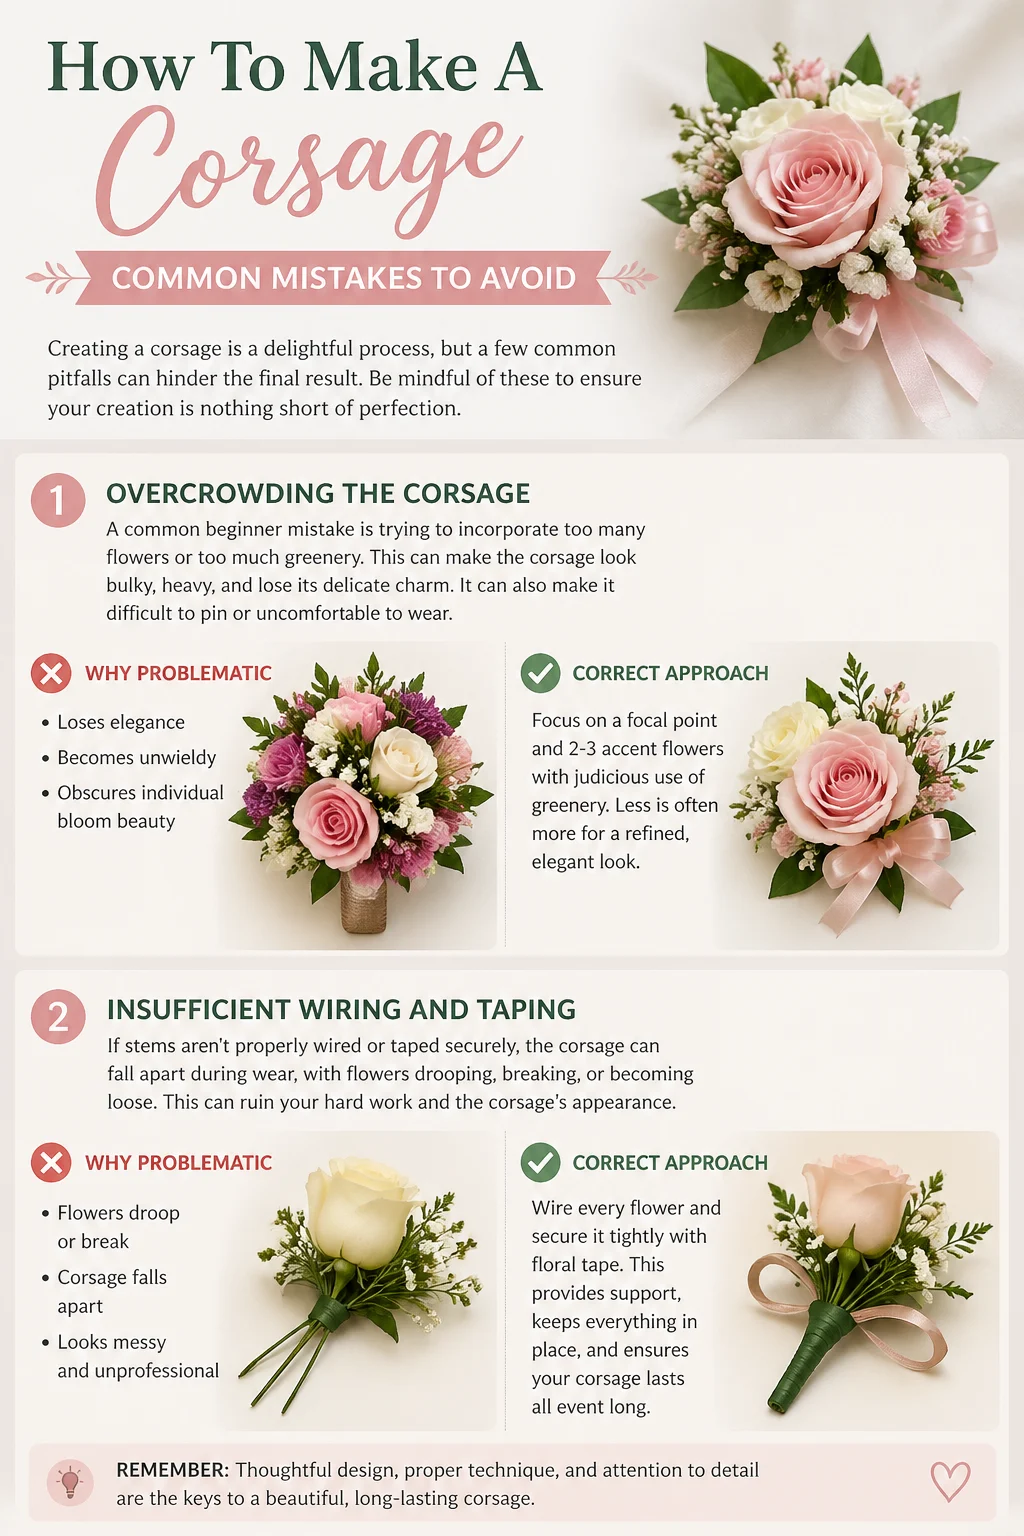
- Overcrowding the Corsage: A common beginner mistake is trying to incorporate too many flowers or too much greenery. This can make the corsage look bulky, heavy, and lose its delicate charm. It can also make it difficult to pin or uncomfortable to wear.
Why problematic: Loses elegance, becomes unwieldy, obscures individual bloom beauty.
Correct approach: Focus on a focal point and 2-3 accent flowers with judicious use of greenery. Less is often more for a refined, elegant look. - Insufficient Wiring and Taping: If stems aren’t properly wired or taped securely, the corsage can fall apart during wear, with flowers drooping or detaching. This is especially true for heavier blooms.
Why problematic: Structural failure, embarrassing for the wearer, ruins the aesthetic.
Correct approach: Ensure each bloom and piece of greenery is individually wired and taped. When assembling, wrap all stems tightly with floral tape, creating a firm, cohesive base. - Ignoring Scale and Proportion: A corsage that is too large for the wearer’s frame or too small to be noticed can look awkward. Similarly, using flowers that are disproportionately large for a corsage can throw off the balance.
Why problematic: Looks out of place, can be uncomfortable, distracts from the wearer.
Correct approach: Consider the wearer’s size and the occasion. Aim for a finished corsage that is generally 3-5 inches in diameter for a wrist corsage, or slightly larger for a lapel. Choose flowers that complement each other in size. - Not Hydrating Flowers Properly: Flowers that aren’t fully hydrated before assembly will wilt quickly, even if stored correctly afterwards. This means your beautiful creation might not last through the event.
Why problematic: Premature wilting, dull appearance, short lifespan.
Correct approach: Always cut flower stems at an angle under running water and place them in fresh water with floral food for several hours (ideally overnight) before you begin assembly. - Choosing Overly Delicate or Bruise-Prone Flowers: Some flowers are simply too fragile for a corsage, which will be handled and worn closely. Very delicate petals can bruise easily, and heavy blooms may not hold up.
Why problematic: Flowers look damaged quickly, ruin the fresh aesthetic.
Correct approach: Opt for more robust flowers known for their longevity and resilience, such as spray roses, carnations, ranunculus, orchids, freesia, and sturdy greens like eucalyptus. Test a small piece of a new flower type for durability if unsure.
Troubleshooting
Even with the best intentions, you might encounter a few hiccups along the way. Here are solutions to common corsage-making issues:
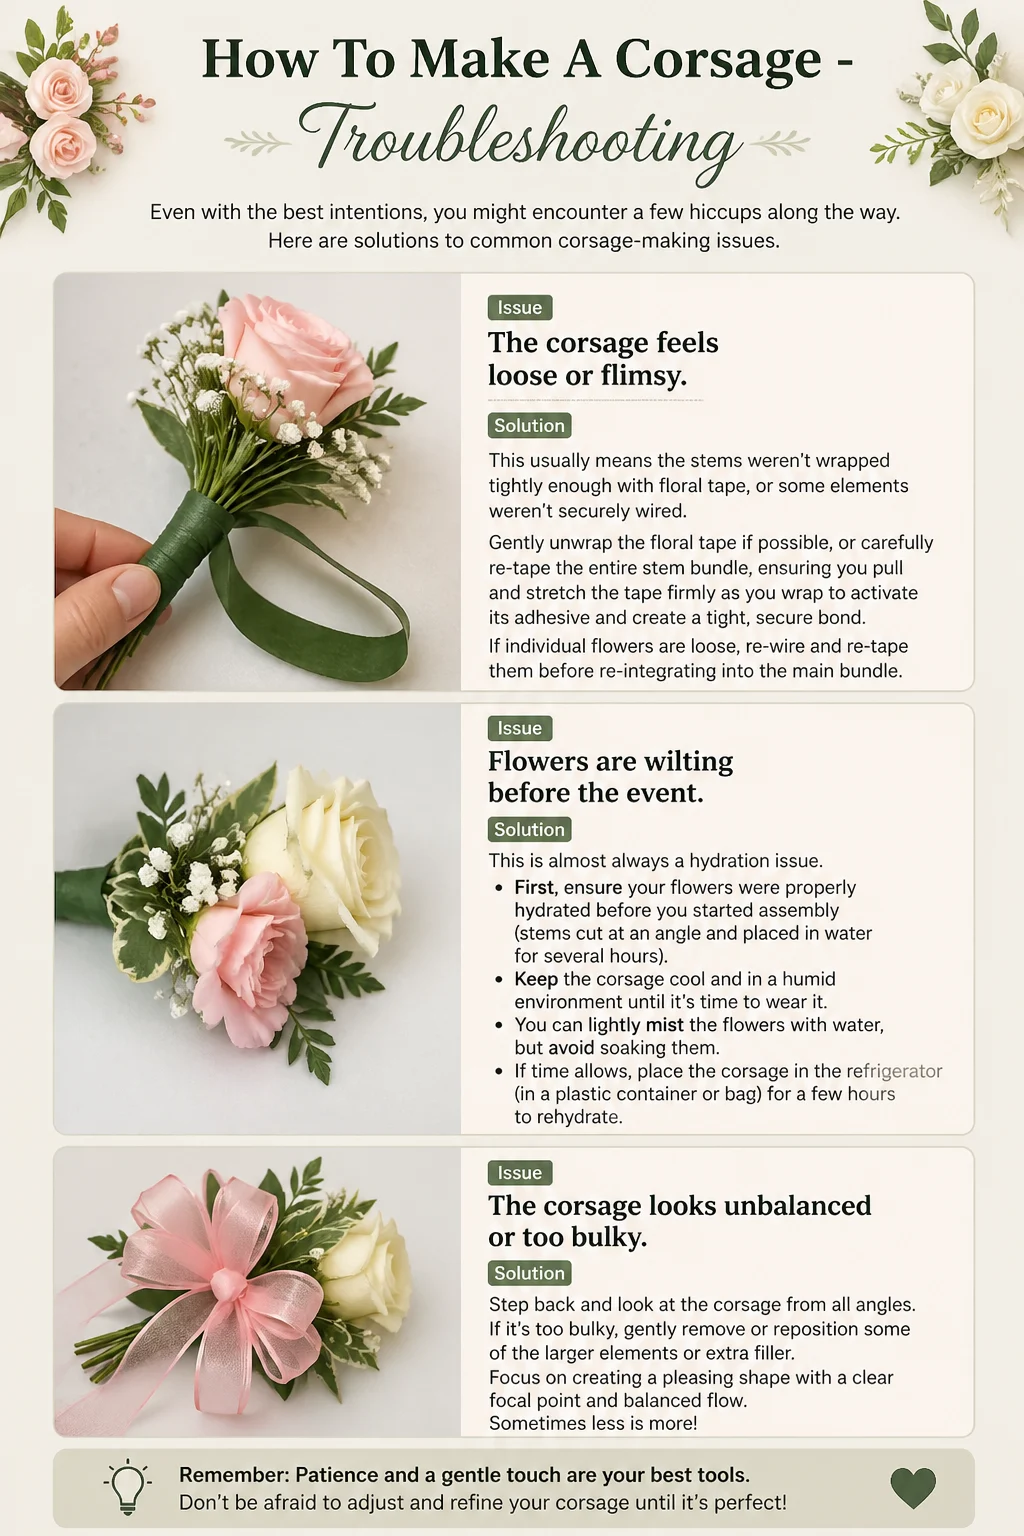
- Issue: The corsage feels loose or flimsy.
Solution: This usually means the stems weren’t wrapped tightly enough with floral tape, or some elements weren’t securely wired. Gently unwrap the floral tape if possible, or carefully re-tape the entire stem bundle, ensuring you pull and stretch the tape firmly as you wrap to activate its adhesive and create a tight, secure bond. If individual flowers are loose, re-wire and re-tape them before re-integrating into the main bundle. - Issue: Flowers are wilting before the event.
Solution: This is almost always a hydration issue. First, ensure your flowers were properly hydrated before you started assembly (stems cut at an angle, in fresh water with floral food). If they’re wilting after assembly, mist the corsage lightly with water and place it immediately back into a cool, dark, humid environment (like a sealed container in the refrigerator, away from fruit). For severe wilting, you can sometimes revive them by submerging the entire corsage (minus the ribbon) in cool water for 20-30 minutes, then re-misting and refrigerating. - Issue: The ribbon looks messy or won’t hold its shape.
* Solution: The type of ribbon can affect its drape and hold. If using a very soft or thin ribbon, you might need to use a slightly stiffer wire to help shape the loops before taping them in place. For a simple bow, ensure you’re tying it securely and evenly. If the ends are fraying, carefully trim them with sharp scissors and gently singe synthetic ribbons with a lighter. For a truly crisp look, consider using floral adhesive to secure ribbon loops or tails in place.
Key Takeaways
Crafting a corsage is an art form that blends planning, precision, and personal touch. Remember these core principles for a stunning creation:
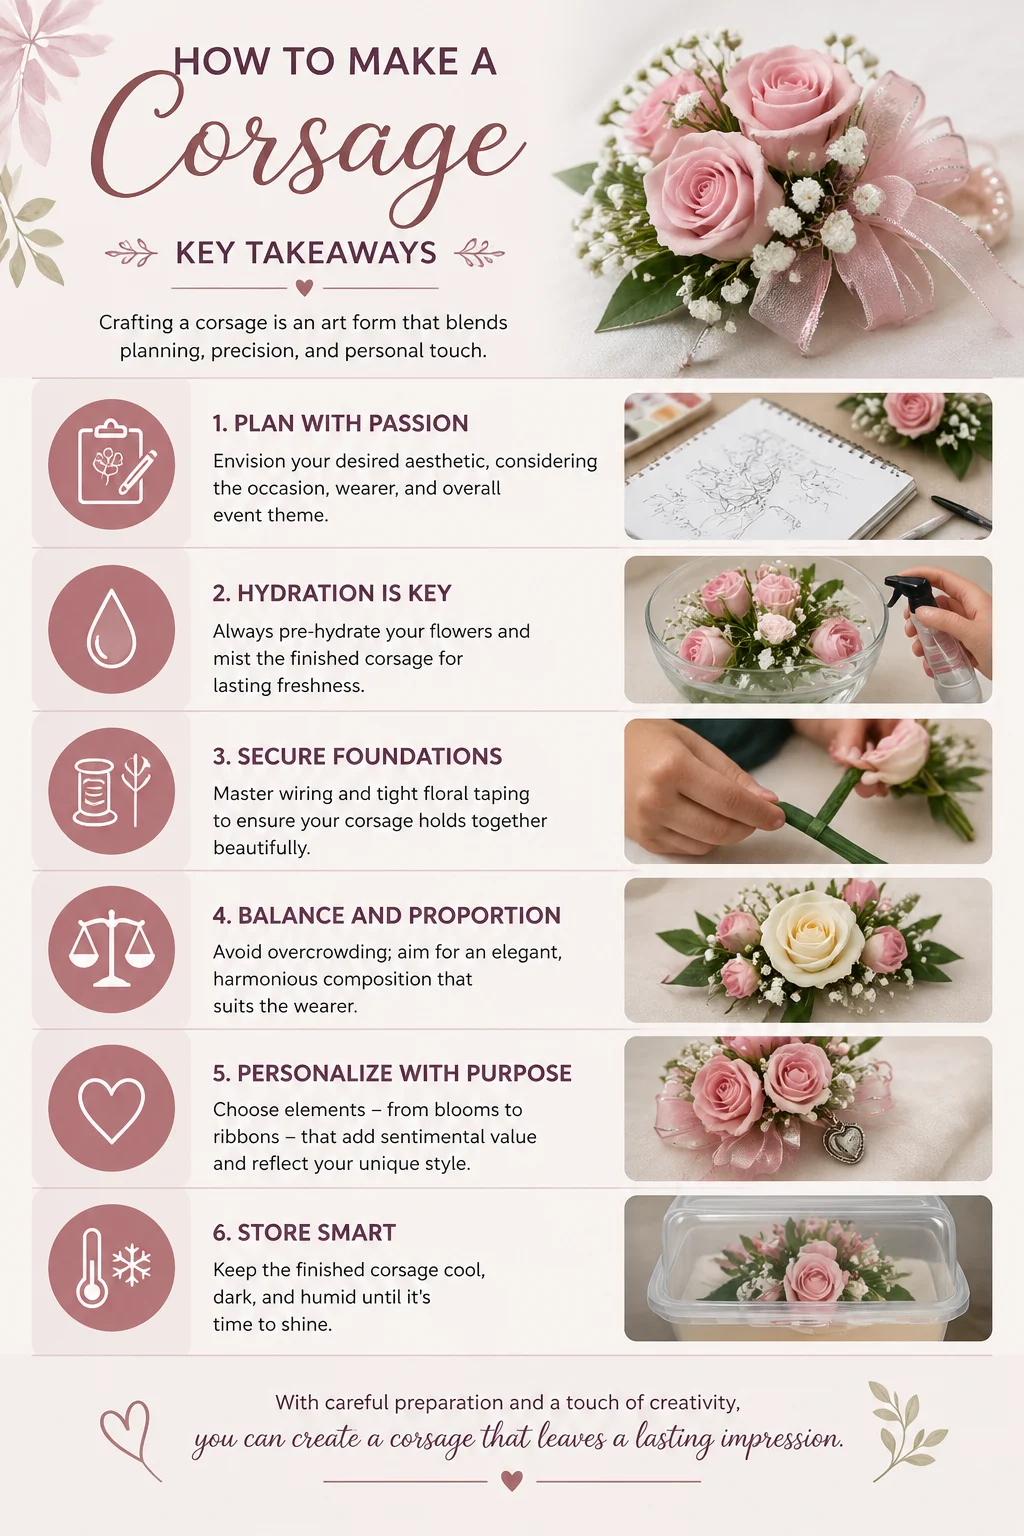
- Plan with Passion: Envision your desired aesthetic, considering the occasion, wearer, and overall event theme.
- Hydration is Key: Always pre-hydrate your flowers and mist the finished corsage for lasting freshness.
- Secure Foundations: Master wiring and tight floral taping to ensure your corsage holds together beautifully.
- Balance and Proportion: Avoid overcrowding; aim for an elegant, harmonious composition that suits the wearer.
- Personalize with Purpose: Choose elements – from blooms to ribbons – that add sentimental value and reflect your unique style.
- Store Smart: Keep the finished corsage cool, dark, and humid until it’s time to shine.
Frequently Asked Questions
Q: How long will a fresh corsage last?
A: With proper hydration and storage, a fresh corsage can last 1-3 days. Some very hardy flowers might last a bit longer, but for peak freshness and vibrancy, it’s best to make it no more than 12-24 hours before the event.
Q: Can I use artificial flowers instead of fresh ones?
A: Absolutely! Artificial flowers offer durability and can be prepared well in advance. While they lack the fragrance and delicate texture of fresh blooms, high-quality silk or “real touch” artificial flowers can create a beautiful and lasting corsage, perfect for a keepsake.
Q: What’s the difference between a corsage and a boutonnière?
A: A corsage is typically a larger floral arrangement designed to be worn on a woman’s wrist or pinned to her dress/lapel. A boutonnière is a single bloom or a small cluster of flowers worn by a man on his lapel, usually smaller and more understated than a corsage.
Q: When should I make my corsage?
A: For optimal freshness, it is recommended to assemble your corsage the day before or the morning of the event. This allows the flowers to be at their most vibrant when worn, while giving you enough time for preparation and proper storage.
What’s Next?
Congratulations, you’ve created a beautiful, Pinterest-worthy corsage, a true testament to your creativity and love! This is just the beginning of your floral journey. Why not continue to explore the enchanting world of floral design?
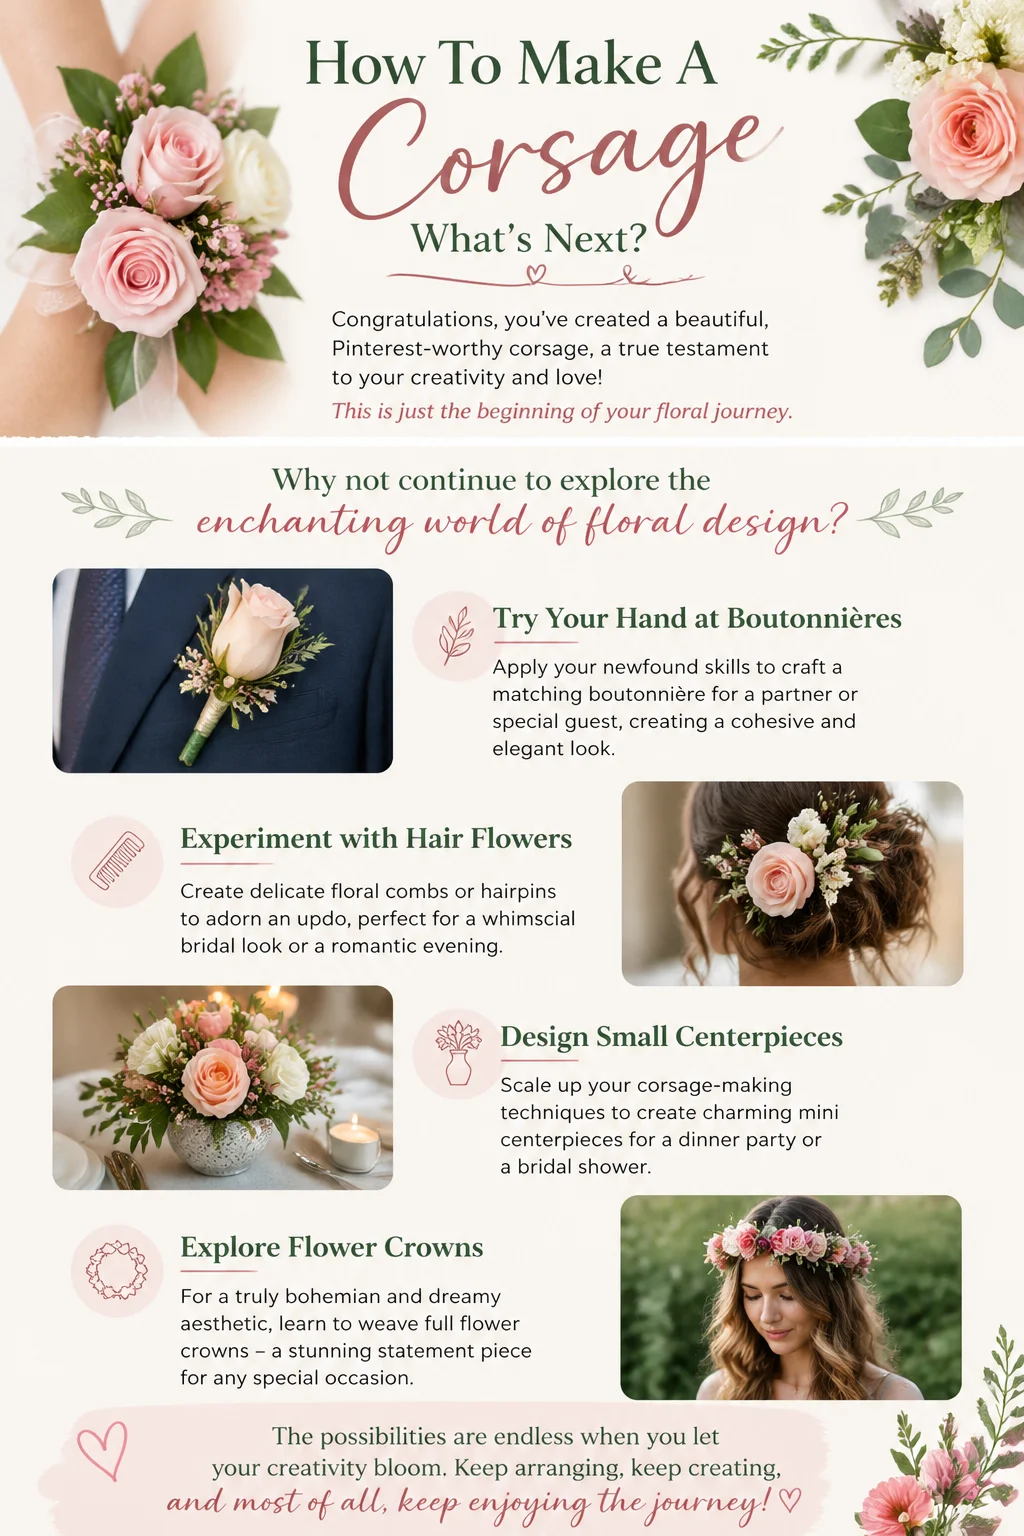
- Try Your Hand at Boutonnières: Apply your newfound skills to craft a matching boutonnière for a partner or special guest, creating a cohesive and elegant look.
- Experiment with Hair Flowers: Create delicate floral combs or hairpins to adorn an updo, perfect for a whimsical bridal look or a romantic evening.
- Design Small Centerpieces: Scale up your corsage-making techniques to create charming mini centerpieces for a dinner party or a bridal shower.
- Explore Flower Crowns: For a truly bohemian and dreamy aesthetic, learn to weave full flower crowns – a stunning accessory for a bride, bridesmaid, or festival-goer.
Don’t let your creativity wilt! Share your stunning creations on social media, inspire others, and continue to bring beauty into the world, one bloom at a time. The magic of handmade is waiting for you – take the next step today!